The settings on this page customize how employees interact with Toast POS devices.
To review and change settings on the Front of house > Order screen setup > UI options page, you must have the Web Setup > 6.6 Restaurant Operations Setup access permission.
When applying these settings to multiple locations, you can select locations for each setting option. Use the Select locations to manage dropdown menu at the top of the page to choose locations to apply the UI options to. Use the dropdown menu under the Select locations option to open the Select locations dialog. You can select the locations you want to apply the setting option to by using the Locations or Groups tab.
For settings where you can select more than one option or uses a custom field, you create a set of options that can then be applied to locations. Add a new entry, modify the entry in the dialog that appears, and then select locations.
The following table provides information about the settings of the Login screen section on the Front of house > Order screen setup > UI options page.
| Setting | Options and description | ||
|---|---|---|---|
|
The settings described in this table affect the set of buttons that are available on the Toast POS devices used by employees, and the way that orders appear on order screens and on printed and KDS device kitchen tickets. |
|||
| Mask passcode |
This setting allows you to apply passcode masking.
You can also allow employees to access Toast POS devices that have a magnetic card reader by swiping a card with a magnetic stripe. On Toast POS devices, you associate a card with an employee passcode by selecting Manager Activities > Register Swipe Card. |
||
| Additional text |
This setting accepts a text string. The text appears along the bottom of the sign in screen of your Toast POS devices. It appears above the Toast POS version number and in the same size font.
|
||
The following table provides information about the settings of the Order screen section on the Front of house > Order screen setup > UI options page.
| Setting | Options and description | ||||||||
|---|---|---|---|---|---|---|---|---|---|
|
The settings described in this table affect the set of buttons that are available on the Toast POS devices used by employees, and the way that orders appear on order screens and on printed and KDS device kitchen tickets. |
|||||||||
| Additional Modifier Groups |
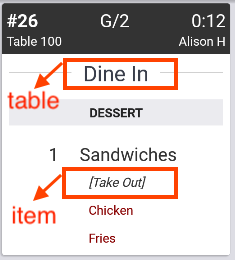
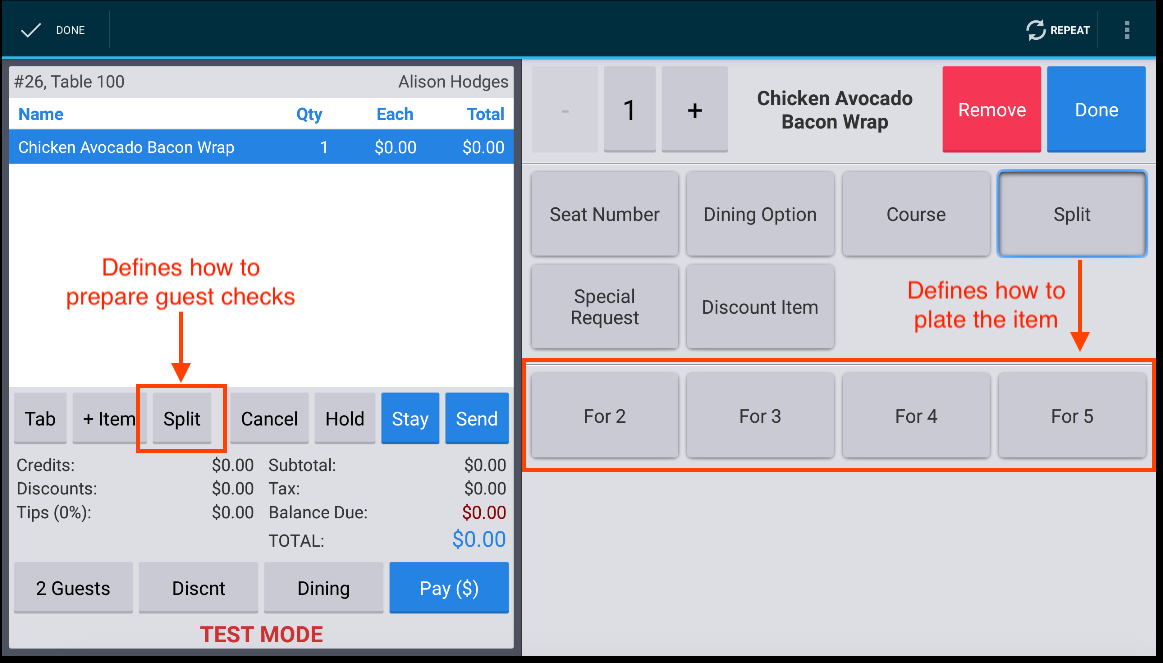
This setting lists modifier groups that you can include on the order screen for every menu item. The modifier options that employees select from these modifier groups appear on kitchen tickets to help coordinate serving, packaging, plating, and preparing items to each guest's specifications. To include a button for an additional modifier group, select the Enabled checkbox. In the example, all of the additional modifier groups are enabled. Each enabled modifier group appears on the right, or bottom, of the screen after the menu-related modifier groups for the item being ordered. 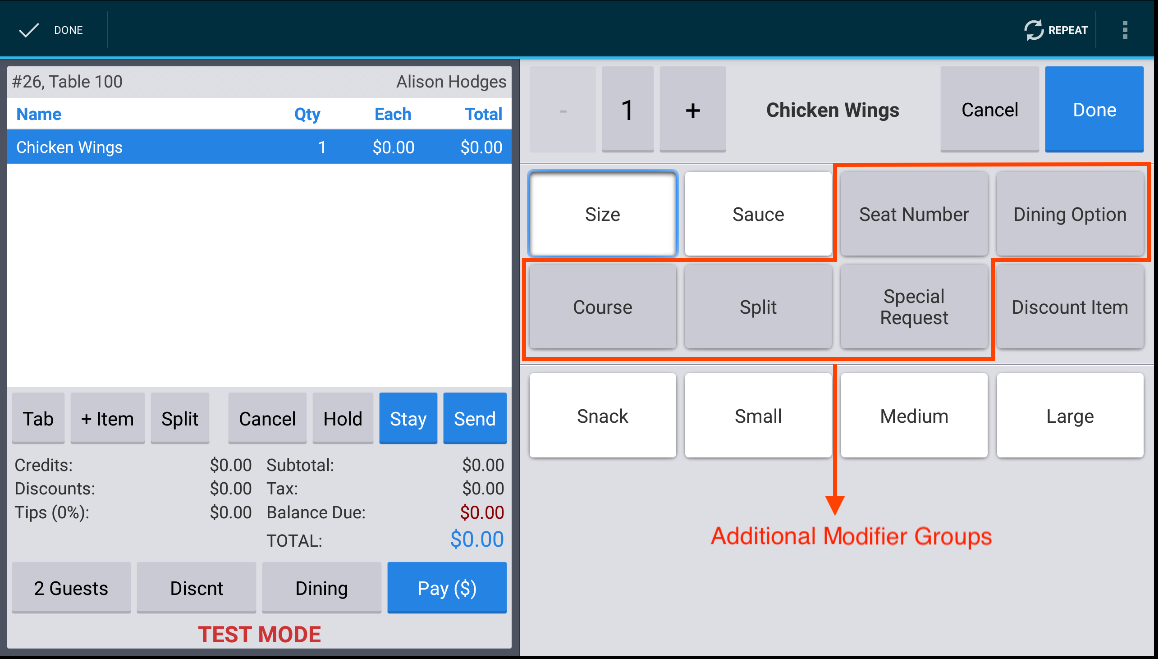 If an ordered item does not have any associated menu-related modifier groups, employees select the ordered item to access buttons for additional modifier groups. You can also change the sequence in which the additional modifier buttons appear on order screens. To move a button to a different location, click and drag the reorder icon next to the name of the additional modifier group.
|
||||||||
| Special request price entry |
When enabled, a price can be specified for each Special Request additional modifier. |
||||||||
| Show Send, Stay, and Hold buttons |
This setting only applies if Orders send only after check is paid is set to Off. This setting lists buttons that you can use on order screens. To include a button for one of these actions, select the checkbox next to the action name.
|
||||||||
| Valid SSIDs |
This setting identifies the valid service set identifier (SSID) name of your wireless local area network (WLAN). When you use this setting to set one or more SSIDs, Toast POS devices will only connect to the internet using the specified network(s). To add an SSID, select Add SSID and enter the name of the network in the entry field that appears.
|
||||||||
| Orders send only after check is paid |
This setting determines whether payment is required before orders are sent to the kitchen for fulfillment.
|
||||||||
| Prompt for tab name? (Quick Order only) |
This setting determines whether a tab name (or credit card swipe) is required for dine-in orders when employees use quick order mode to send an order to the kitchen. The tab name appears at the top of the kitchen ticket under the order number.
For more information about the effects of these options, see KDS ticket contents. |
||||||||
| Prompt for dining option? (Quick Order only) |
For restaurants and devices that do not have a default dining option, this setting determines whether a dining option must be specified when employees send an order to the kitchen using quick order mode. The dining option appears at the top of the kitchen ticket.
For more information about the effects of these options, see KDS ticket contents. |
||||||||
| Show item sent time |
This setting determines whether the time that the order was sent to the kitchen appears below the item list on the order screen.
|
||||||||
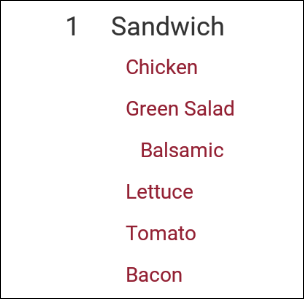
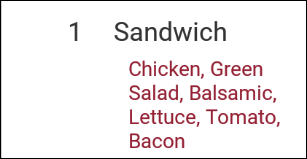
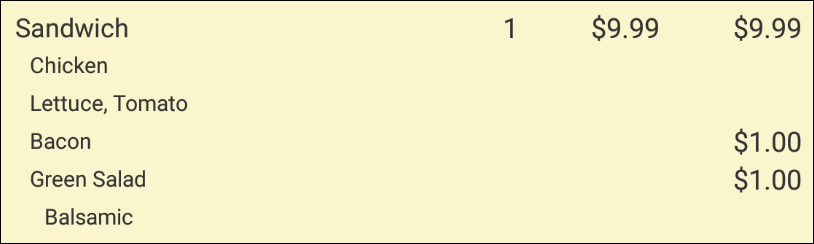
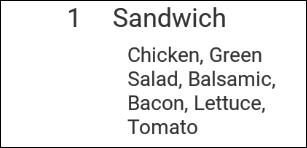
| Modifier display mode |
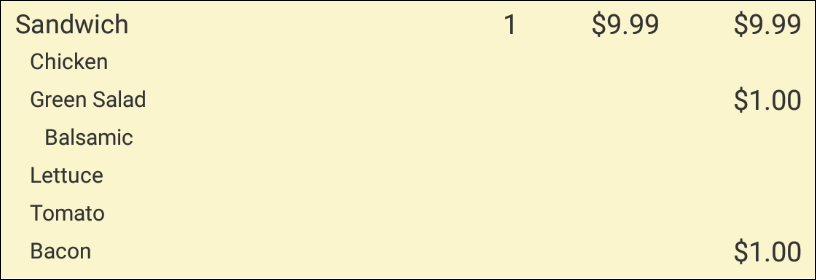
This setting controls how modifiers appear under menu items on order screens and printed and KDS device kitchen tickets. Illustrations of the order and kitchen tickets for each setting are provided. The example order is for a sandwich item with the following modifiers entered in sequence: required modifiers for meat (chicken) and side (green salad, which has an extra charge and requires the dressing modifier, balsamic), and optional modifiers of bacon (extra charge), lettuce, and tomato. Add modifier charges to item price is set to On and Modifier group sorting is set to Display in order modifiers are listed in their modifier group.
For more information about the effects of these options, see KDS ticket layout. |
||||||||
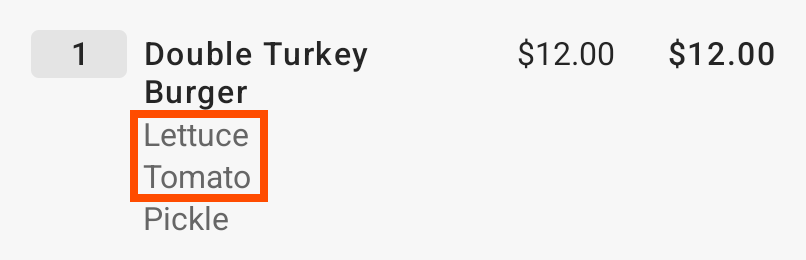
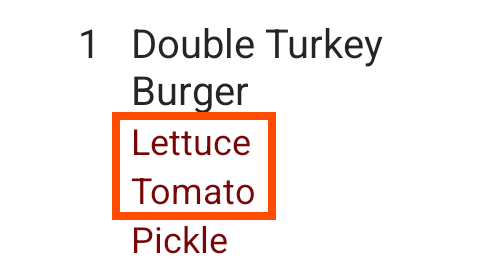
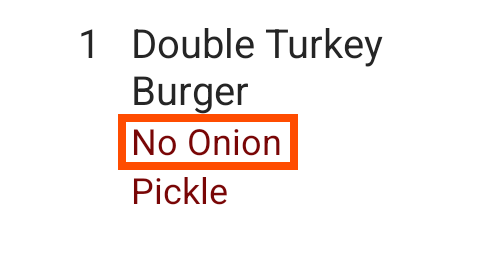
| Show default modifiers? |
This setting determines how default modifiers in a modifier group appear on order screens and printed and KDS device kitchen tickets. Illustrations of the order and kitchen tickets for each setting are provided. The example order is for a burger item that has default modifiers of lettuce, onion, and tomato. The guest in this example asks for lettuce and tomato but no onion and adds the optional pickle modifier. Modifier display mode is set to Vertical: list one modifier per line.
|
||||||||
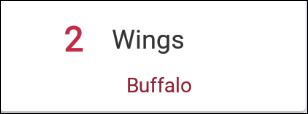
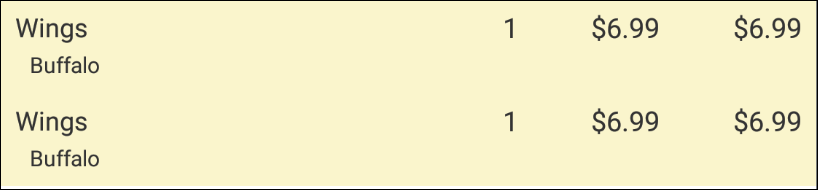
| Consolidate menu items |
This setting determines whether each item in an order appears on a separate line, or if identical items (with identical modifiers if any) in an order are summed and shown on one line with the total count.
Illustrations of the order and kitchen tickets for each setting are provided. The example order is for two identical chicken wings with Buffalo sauce. Modifier display mode is set to Vertical: list one modifier per line.
For more information about the effects of these options, see KDS ticket layout. |
||||||||
| Consolidate discounts |
This setting determines whether an item-level fixed currency discount is applied to each item in a consolidated group of identical items in an order.
|
||||||||
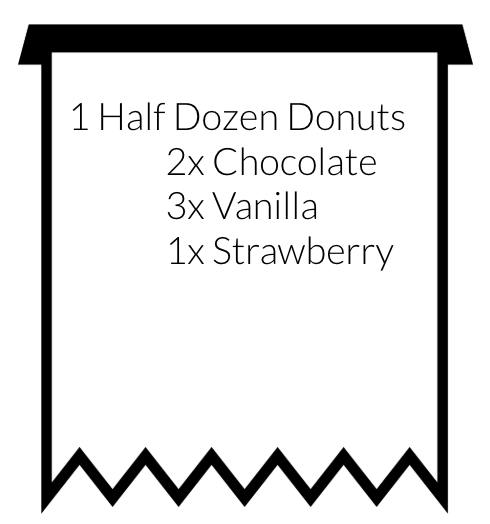
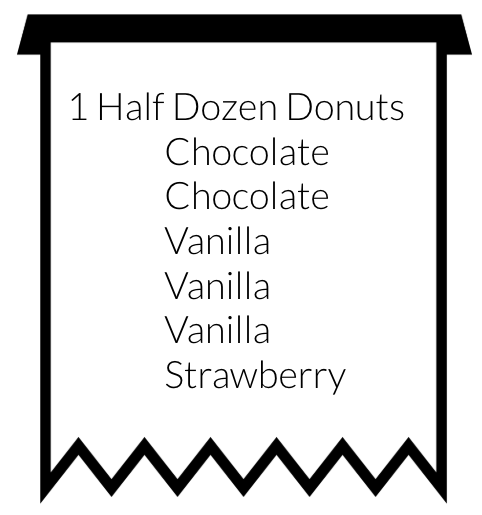
| Consolidate modifiers |
This setting determines whether each modifier option for a menu item appears on a separate line or if identical modifier options are combined and shown on one line with the total count. The configuration of the Consolidate modifiers setting affects the way that modifier options appear on:
You can select:
|
||||||||
| Add modifier charges to item price |
This setting determines whether the prices defined for modifier options are summed with the menu item price for one total, or appear separately from menu item prices.
|
||||||||
| Modifier group sorting |
For restaurants with Modifier display mode set to Vertical: list one modifier per line or Horizontal: list all modifiers on one line, comma separated, this setting controls the sequence in which modifier options appear on order screens and printed and KDS device kitchen tickets.
For example, you serve different kinds of barbecue sauce with your chicken wings, defined as options in the modifier group as mild, medium, hot, and insane. When guests order more than one of the sauces with their wings, they can either be listed in the order that the employee adds them (hot, mild, insane), or always in the same sequence relative to each other (mild, hot, insane).
For more information about the effects of these options, see KDS ticket layout. |
||||||||
| Modifier ordering priority |
This setting determines the sequence in which modifier group buttons appear on order screens and how modifiers are organized on printed and KDS kitchen tickets. This option applies to modifier groups defined in the menu. If you enable any of the additional modifier groups, they appear after the menu modifier groups.
|
||||||||
| Show fast cash button? (Quick Order only) |
This setting determines whether employees using Quick Order mode can use a single button to accept payments in cash for the exact amount of the check.
|
||||||||
| Close order screen after printing receipt |
This setting determines whether the order screen remains open to the same order after employees tap Print to print a guest receipt.
|
||||||||
| Auto switch user |
This setting determines how frequently employees need to sign in to Toast POS devices. Applies to all order screens: Quick Order, Table Service, and Delivery.
|
||||||||
| Edit other employees' checks confirmation |
This setting determines whether employees who have the Edit Other Employees' Orders access permission must respond to a confirmation prompt when they edit another employee's check.
|
||||||||
| Enable promo code search |
This setting determines whether order screens include the Promo Code option on the overflow menu (the ⋮ icon).
|
||||||||
| Enable manual entry when using scale |
This setting determines whether employees, when using a device that is connected to a scale, can enter item weights manually.
|
||||||||
| Menu item search |
When enabled, employees can search for menu items by name using a search bar and the on-screen keyboard. |
||||||||


The following table provides information about the settings of the POS Scheduling Settings section on the Front of house > Order screen setup > UI options page.
The following table provides information about the settings of the Service Areas Screen section on the Front of house > Order screen setup > UI options page.
The following table provides information about the settings of the Tipping section on the Front of house > Order screen setup > UI options page.
| Setting | Options and description | ||
|---|---|---|---|
| Tip / Tax |
This setting determines the sequence in which the Toast platform calculates suggested tip amounts and fixed percent service charges.
Examples of how the Toast platform calculates suggested tips and service charges follow. Suggested tip: For items totalling $50, a tax rate of 7.5%, and suggested tip percentages of 15%, 18%, and 20%, the system:
Note that the total on the check, which is paid to the restaurant, is the same in both cases. The actual tip amount paid directly to the employee is at the guest's discretion. Service charge: For items totalling $1000, a tax rate of 6.25%, and a service charge of 20% (taxed at the same rate), the system either:
Note that service charges, unlike tips, are included in the check total and collected by the restaurant. As a result, the setting that you choose for this option can affect the total check amount. Appropriate variations on these computations apply to service charges that have different tax rates or that are not taxed. For more information about service charges, see Service charge overview. |
||
| Tip & signature flow |
|
||
| Tip options |
|
||
| Tip option transaction amount |
This setting appears if Tip options is set to Show tip options in amounts and percentages. This setting determines the total check value used to determine whether the suggested tips are dollar amounts or percentages. |
||
| Tip amounts |
This setting appears if Tip options is set to either Show tip options in amounts only or Show tip options in amounts and percentages. You can enter up to three dollar amounts. Each value defines a dollar amount to automatically add as a tip. For example, 1.00, 1.50, 2.00.
|
||
| Default amount |
This setting appears if Tip options is set to Show tip options in amounts only. This setting determines what tipping option is preselected on the guest-facing display.
|
||
| Tip percentages |
This setting appears if Tip options is set to either Show tip options in percentages only or Show tip options in amounts and percentages. You can enter up to three numbers. Each value defines a percentage of the check total to automatically add as a tip. For example, 15, 18, 20. To include these percentages on guest receipts, you must also enable the Display Tip Percentages on Customer Receipts setting on the Marketing > Receipt Setup page.
|
||
| Default percentage |
This setting appears if Tip options is set to either Show tip options in percentages only or Show tip options in amounts and percentages. This setting determines what tipping option is preselected on the guest-facing display.
|
||
| Require approval? |
|
||
| Minimum amount |
This setting appears only if Requires approval? is Yes. This defines the minimum amount a tip must be to require manager approval. |
||
| Minimum % of balance due |
This setting appears only if Requires approval? is Yes. This defines the minimum percentage of the check a tip must equal to require manager approval. |
The following table provides information about the Advanced shift review setup page settings. To go to the Advanced shift review setup page, select Employees > Shift review > Advanced shift review setup.
|
Note |
|
If configuring these settings for the first time, select Employees > Shift review > Shift review setup. |
| Setting | Options and Description | ||
|---|---|---|---|
| Require shift review |
This setting determines whether employees must close the checks for all of their orders and declare their cash tips before they clock out.
|
||
| Non-cash tips |
|
||
| Gratuities (service charges) |
|
||
| Who is responsible for closed cash checks? |
|
||
| Declare cash tips |
|
||
| Negative cash tips |
This setting appears only if Declare cash tips is Tipped employees must declare cash tips.
For more information about the effect of these options, see the Negative Declared Tips manager access permission. |
||
| Minimum tip percentage |
This setting appears only if Declare cash tips is Tipped employees must declare cash tips. The value of this setting defines the minimum amount, as a percentage of cash tips, that employees must report during shift review. For more information about the effect of this setting, see Closing cash drawer. |
||
| Require reconcile cash & tips |
|
||
| Lock employee to cash drawer |
|
The following list contains the sections you can include in the Shift review report. To go to the Shift review report page, select Employees > POS report configurations > Shift review report. For more information about these sections, see Shift review report configurations.
The Shift review report setting lists the sections that you can include in your shift review report.
-
Employee Account
-
Tips & Fees Earned
-
My Guest Report
-
Credit Tip Audit
-
Tip Sharing
-
Delivery
-
Sales & Taxes Summary
-
Cash/Credit Per Sales Category
-
Revenue Centers
-
Total Voids
-
Total Removals
-
Total Discounts
-
Total Payments
-
Credit Card Breakdown
-
Other Breakdown
-
Employee Signature
-
Pay Outs
To include a section in the shift review report, select the checkbox next to the section name under the Show? column.
You also have the option to change the order of the sections. Click or tap and drag the reorder icon next to a section name and move it to a different location in the list.
The following list contains the sections you can choose to include in the Z Report. To go to the Z Report page, select Front of house > Order screen setup > UI options > Report configurations and follow the link under the Z report configurations section. For more information about these sections, see this Toast Support article.
The Z Report setting lists sections that you can include in your Z report.
-
Sales & Tax Summary
-
Sales Categories
-
Revenue Centers
-
Payment Details
-
Server Tip Outs
-
Total Voids
-
Total Removals
-
Total Discounts
-
Credit Card Breakdown
-
Other Payments Breakdown
-
Labor
-
Employee Over/Short
-
Employee Signature
-
Pay Out Breakdown
-
Deposit Summary
-
Delivery
To include a section on the Z report, select the checkbox next to the section name under the Show? column.
You also have the option to change the sequence in which these sections appear. Click or tap and drag the reorder icon next to a section name and move it to a different location in the list.
The following table provides information about the settings of the Closed Drawer Report page. To go to the Closed Drawer Report page, select Finance > Related > Settings > Cash overview > POS report configurations > Cash drawer report. For more information about the sections you can include in your closed drawer report, see this Toast Support article.
| Setting | Options and description |
|---|---|
| Closed Drawer Report |
|
| Section Name |
This setting lists sections that you can include in your closed drawer report.
To include a section in the closed drawer report, select the checkbox next to the section name under the Show? column. You also have the option to change the sequence in which these sections appear. Click or tap and drag the reorder icon next to a section name and move it to a different location in the list. |
The following table provides information about the settings of the Time clock section on the Front of house > Order screen setup > UI options page.
The following table provides information about the settings of the Tax options section on the Front of house > Order screen setup > UI options page.
| Setting | Options and description |
|---|---|
| Receipt tax options > Layout |
|
| Receipt tax options > Label |
This setting appears only if Receipt Tax options > Layout is One line. The label appears on printed guest receipts to identify the total amount charged as tax. This setting accepts a text string. |
| Smart tax |
For more information, see Smart tax. |
The following table provides information about the settings of the Order management section on the Front of house > Order screen setup > UI options page.
| Setting | Options and description |
|---|---|
| Strict mode |
For more information about Strict mode, see this Toast Support article. |