This section provides procedures and information about configuring kitchen tickets.
Preparing orders accurately and efficiently can be an ongoing challenge, and errors can be expensive. With the KDS, you can use color to make the differences and similarities between menu items or modifiers easier to identify and act on.
In addition, this Toast Support article provides an overview of customizing colors for KDS devices.
Examples of how you can use color-coding on your KDS tickets follow.
-
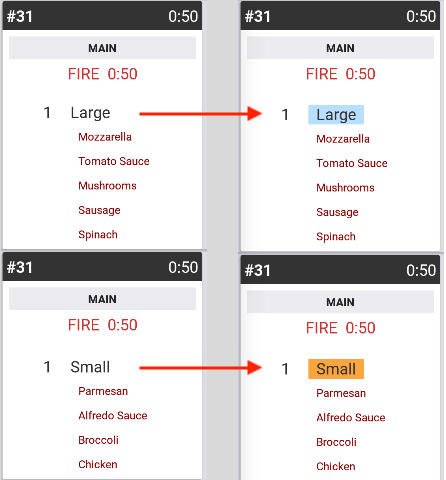
You can identify a critical difference between menu items, such as the item size, by assigning a different color to each item. The following illustration shows KDS tickets for an order with large and small pizza items, before and after you assign different KDS colors to the items.
-
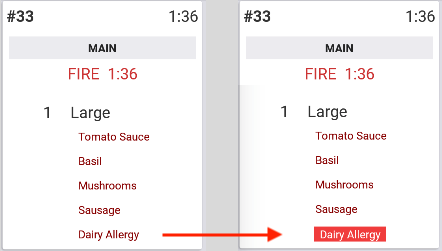
You can alert employees to a guest's health concerns by assigning colors to your allergy modifiers. The following illustration shows KDS tickets for a pizza order that includes an allergy alert, before and after you assign a KDS color to the allergy modifier.
-
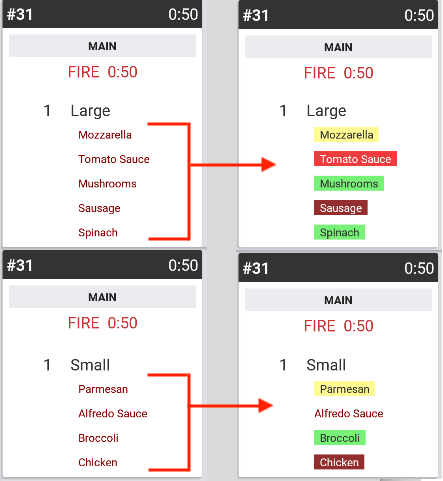
You can make the assembly of an item that contains multiple ingredients faster and more accurate by assigning colors to each modifier or to each category of modifiers. The following illustration shows KDS tickets for pizza items that have multiple toppings, before and after you assign different KDS colors to the cheeses, sauces, vegetables, and meats in your toppings modifier group.
-
You can make items and modifiers that get sent to multiple prep stations easier to identify and assign. The following illustration shows a ticket for sandwiches and salads that gets sent to both your Grill/Fry and Cold prep stations, before and after you assign a KDS color to the salad items and modifiers that are the responsibility of the Cold station.
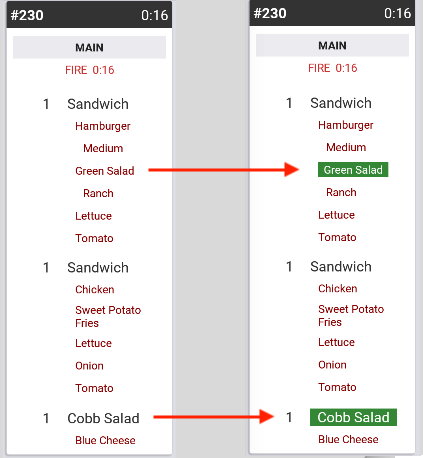
In this example, you could also assign colors to the different salad dressing submodifiers—yellow for ranch and blue for blue cheese, say—to make them easier to distinguish and fulfill accurately.
|
Note |
|
You cannot configure KDS colors for pre and post modifiers. |
To configure your menu items and modifiers to include a custom color background, you must have the 4. Restaurant Admin > 4.5 Edit Full Menu access permission.
Follow one of these procedures.
To configure a KDS color for a menu item
-
Access Toast Web and then choose Menus > Menu manager.
-
Select Full menu view, then go to the menu item you want to edit. Select the item to see its side pane.
-
In the Kitchen section, select the KDS color tile. The color palette opens.
-
Select a color from either the Light mode or the Dark mode palette. A corresponding color is automatically selected in the other palette.
-
Select Save.
-
Publish your changes.
To configure a KDS color for a modifier
-
Determine the modifiers that you want to highlight with color coding, and the color you want to assign to each one.
-
Access Toast Web and then choose Menus > Bulk management > Advanced properties.
-
(Multi-location restaurants only) Choose the locations you want to view from the You are viewing menu.
-
Expand the advanced properties table to find the modifier you want to edit, select its name, then select Edit Item to see the classic details page for the modifier's item reference.
-
Next to the KDS Color, select the square tile. The color palette opens.
-
Select the color that you want to assign to the modifier.
-
Save and publish your changes.
The Toast platform allows you to specify how you want items and modifiers to be listed on kitchen tickets. The logic used to sort items is different from modifiers.
You can choose to sort items by assigned seat numbers, assigned sort order, or by how the items are entered on the order screen. You can use the Item Sorting Priority setting to sort items on kitchen tickets.
-
To sort by assigned seat numbers, you must enable the seat numbers modifier group with the Additional Modifier Groups setting, and assign the Seat Number modifier group to the menu item. If two items have the same seat number, they are sorted by Sort Order, if available. If no Sort Order is available, the items are sorted by how they were added to the order. For more information, see Additional Modifier Groups.
-
To sort by sort order, you must assign a Sort Order value to the menu item. The Sort Order determines how the item is sorted against all other items. If two items have the same Sort Order, they are sorted by Seat Number if available. If no Seat Number is available, the items are sorted by how they were added to the order. If a Sort Order for an item is empty, it is listed after those that have a Sort Order assigned, then by Seat Number if available, and then how they were added to the order. This sorting also affects how items appear on order screens.
-
To sort by how items are added to the order on an order screen, no additional configuration is needed.
For modifiers, there are several settings that can be used to choose how modifiers are sorted on kitchen tickets:
-
Modifier display mode
-
Sort Order
Note
Using the Sort Order setting to sort modifiers on kitchen tickets is in limited release. To access this feature, send an email to
<kitchenfeedback@toasttab.com>. -
Modifier ordering priority
-
Modifier group sorting
|
Note |
|
The Sort Order setting only affects modifiers on kitchen tickets. The Modifier display mode, Modifier ordering priority, and Modifier group sorting settings affect modifiers on both kitchen tickets and order screens. |
How these settings are prioritized depends on several factors. The following is an ordered list detailing the hierarchy of how these settings are applied.
-
If Modifier display mode is set to:
-
Vertical or Horizontal: The other settings affecting modifier sorting order apply as expected.
-
Legacy or Legacy - Flatten: The option and its conditions override all other settings affecting the modifier sorting order.
-
-
If a modifier has a Sort Order configured, that takes precedence and overrides Modifier ordering priority and Modifier group sorting settings. Modifiers that have a Sort Order assigned are listed before the modifiers that do not have a Sort Order.
Note
For Sort Order to apply, Modifier display mode must be set to either Vertical or Horizontal.
-
If no Sort Order is configured for modifiers and Modifier ordering priority is set to On, the modifiers are sorted by modifier group.
Note
For printed kitchen tickets and KDS tickets for dynamic view, Modifier ordering priority is always treated as if it is set to On.
The order in which the modifier groups are displayed is determined by the modifier group’s Display Ordering Priority setting:
-
If the modifier group has a Display Ordering Priority assigned: These modifier groups are listed first, with the lowest Display Ordering Priority number assigned displayed first, and the highest displayed last.
-
If two modifier groups have the same Display Ordering Priority assigned: The modifier group is sorted based on how it’s ordered within the item’s modifier groups list on Toast Web.
-
If a modifier group does not have a Display Ordering Priority assigned: The modifier group appears after modifier groups that do have a Display Ordering Priority assigned. The modifier groups are then sorted based on how they are ordered within the item’s modifier groups list on Toast Web.
-
-
The modifiers are then ordered based on the Modifier group sorting setting option:
-
Display in order modifiers were added: The modifiers are listed the way they were added by an employee on the order screen.
-
Display in order modifiers are listed in their modifier group: The modifiers are listed the same way that they appear within the modifier group on Toast Web.
-
The Toast platform allows you to have separate tickets for each item in an order, or to have an order ticket with all items in an order. For example, you have an order with two items, Panini and Burger that both route to the Hot prep station. If using individual item tickets, this results in two tickets, one with Panini and another with Burger. If not using individual item tickets, this results in a single ticket with two items, Panini and Burger. The Individual Item Tickets setting has separate configurations for both printed and KDS tickets. Individual item tickets can apply to printed prep station tickets, and to KDS prep station and expediter tickets, depending on your setup.
|
Note |
|
Individual tickets apply differently for items with multiple quantities. Depending on your Individual Item Tickets setting options, you can choose to specify whether items with multiple quantities are consolidated into a single item with a multiple quantity, or as separate items each with a quantity of one. For more information, see Consolidate identical items. |
The Individual Item Tickets setting has two parts for Print Settings and KDS Settings.
You can choose to print individual item tickets for prep station printed tickets, and also choose to include a prep station ticket that includes all items sent to that prep station for that course, called an overview ticket. An overview ticket may also be referred to as a master ticket on printed tickets.
|
Note |
|
Individual item tickets and overview tickets only apply to printed prep station tickets. Printed expediter tickets always include all items in a course for an order when configured to send to the expediter. |
When configuring how items appear on printed prep station tickets, there are three Print Settings options to choose from:
-
Print all items from an order on a single ticket: A single prep station ticket with all items sent to that prep station for that course and order.
-
Print individual tickets with an overview ticket at each prep station: Individual tickets for each item sent to that prep station for that course and order, along with an overview ticket that includes all items sent to that prep station for that course and order.

-
Print individual tickets without an overview ticket at each prep station: Individual tickets for each item sent to that prep station for that course and order. No overview ticket is printed.
When using individual tickets, overview tickets, or both, the prep station ticket prints the ticket type at the top, marking it as Individual or Master.
You can choose whether to have all items appear on the same ticket for prep station and expediter KDS devices, only expediter KDS devices, or neither prep station or KDS devices.
|
Note |
|
Items only appear on the expediter KDS device if the prep station they are assigned to is configured to send to the expediter. |
When configuring how items appear on KDS tickets, there are three KDS Settings options to choose from:
-
Display all items from an order on a single ticket: A single prep station KDS ticket with all items sent to that prep station for that course and order and a single expediter KDS ticket with all items for that course and order.
-
Display each item on individual tickets at both prep stations and expos: Individual tickets for each item for that course and order sent to that prep station or expediter KDS device.
-
Display each item on individual tickets at prep stations only: Individual tickets for each item for that course and order sent to that prep station KDS device and a single expediter KDS ticket with all items for that course and order.

Choosing how to configure individual items for printed and KDS tickets can affect how identical items are consolidated. For more information, see Consolidate identical itemsConsolidating identical items.
To configure individual item tickets for printed and KDS tickets
-
Go to the Kitchen > Printers, tickets, & KDS devices > Kitchen and ticket setup page.
-
Under the Printed Tickets and Ticket Screen section, navigate to the Individual Item Tickets setting.
-
Select an option for Print Settings.
-
Print all items from an order on a single ticket
-
Print individual tickets with an overview ticket at each prep station
-
Print individual tickets without an overview ticket at each prep station
For more information about these options, see Print settings.
-
-
Select an option for KDS Settings.
-
Display all items from an order on a single ticket
-
Display each item on individual tickets at both prep stations and expos
-
Display each item on individual tickets at prep stations only
For more information about these options, see KDS settings.
-
-
Save and publish your changes.
|
Note |
|
This setting is in limited release. |
|
Note |
|
If you have the Consolidate menu items setting set to Off, your items appear as they are entered on the order screen and the Consolidate Item with Multiple Quantities setting is ignored. For example, if you enter two individual Panini, they cannot be consolidated at the kitchen level and appear as two individual Panini. If you enter Panini with a quantity of two, they cannot be unconsolidated at the kitchen level and appear as Panini with a quantity of two. |
When you send items to the kitchen, you can choose whether multiple of the same item appear as a single line with an indicated quantity, or as individual lines of one item each. For example, if you enter an order with two Panini, consolidating the items appears as one line for Panini with a quantity of two. By not consolidating, the ticket has two Panini items, each with a quantity of one.
The Consolidate Items with Multiple Quantities setting is available on the Kitchen > Printers, tickets, & KDS devices > Kitchen and ticket setup page under the Printed Tickets and Ticket Screens section.
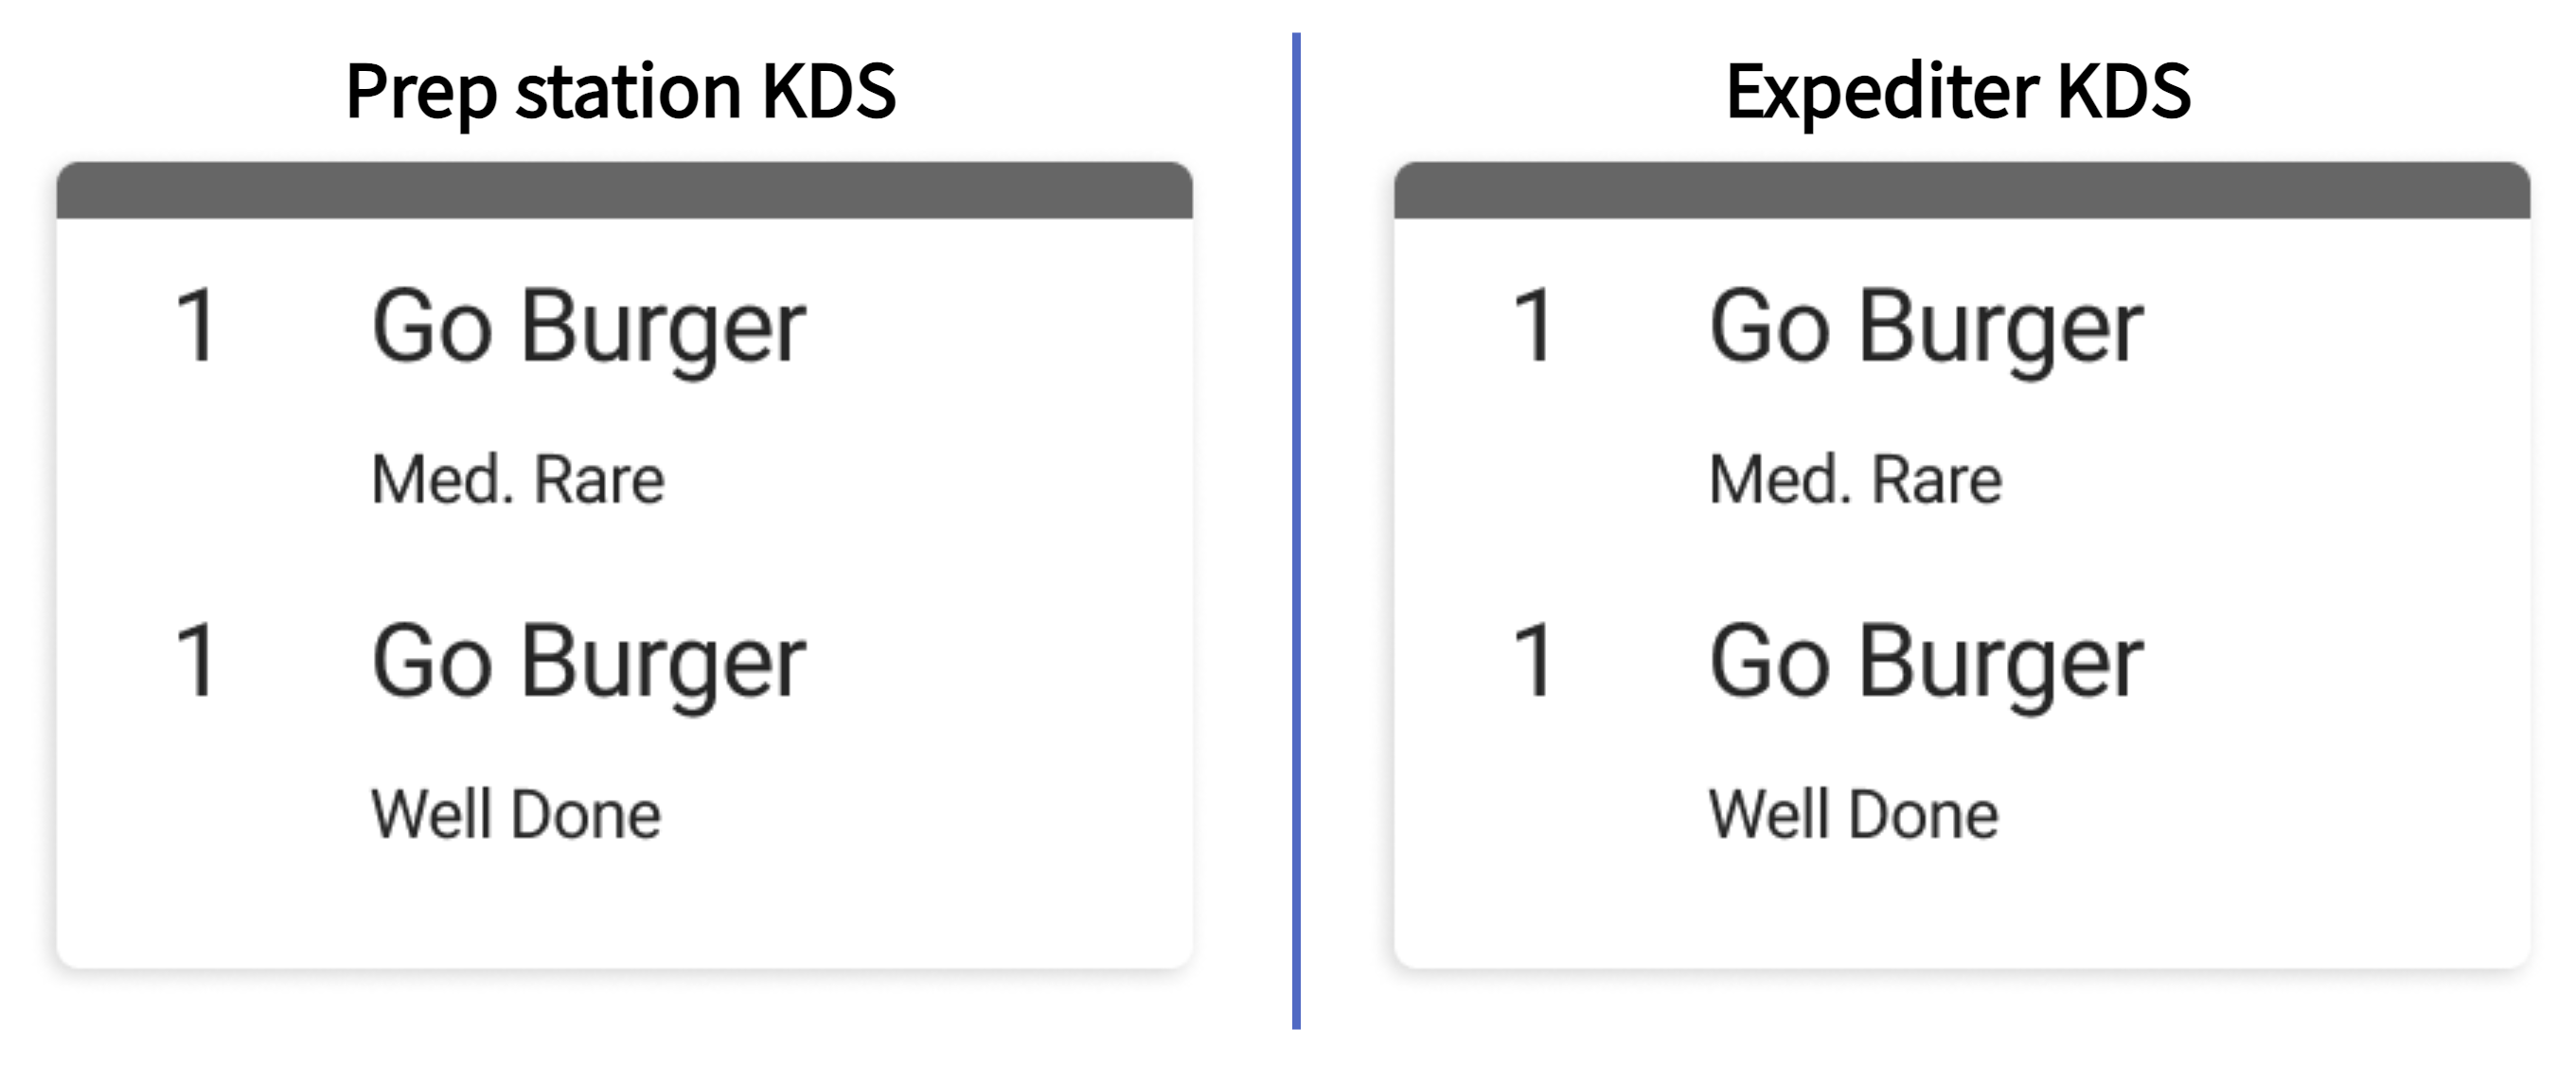
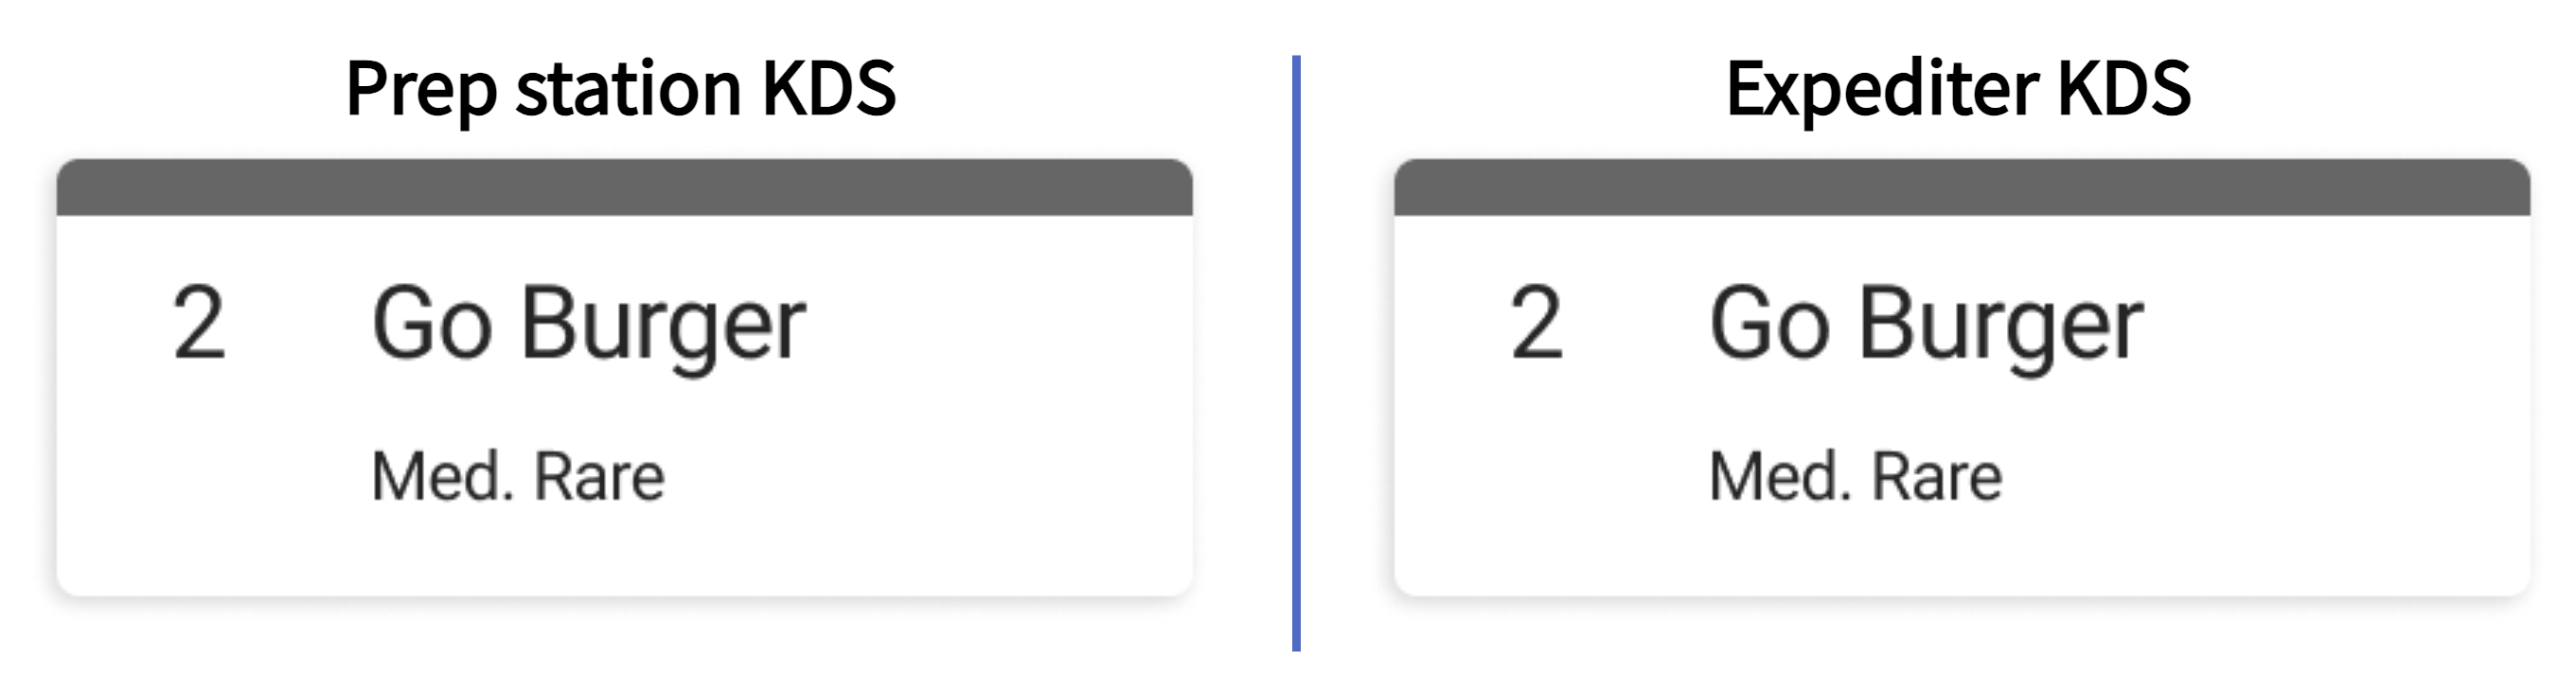
Here is an example of a consolidated ticket at prep station and expediter KDS devices.
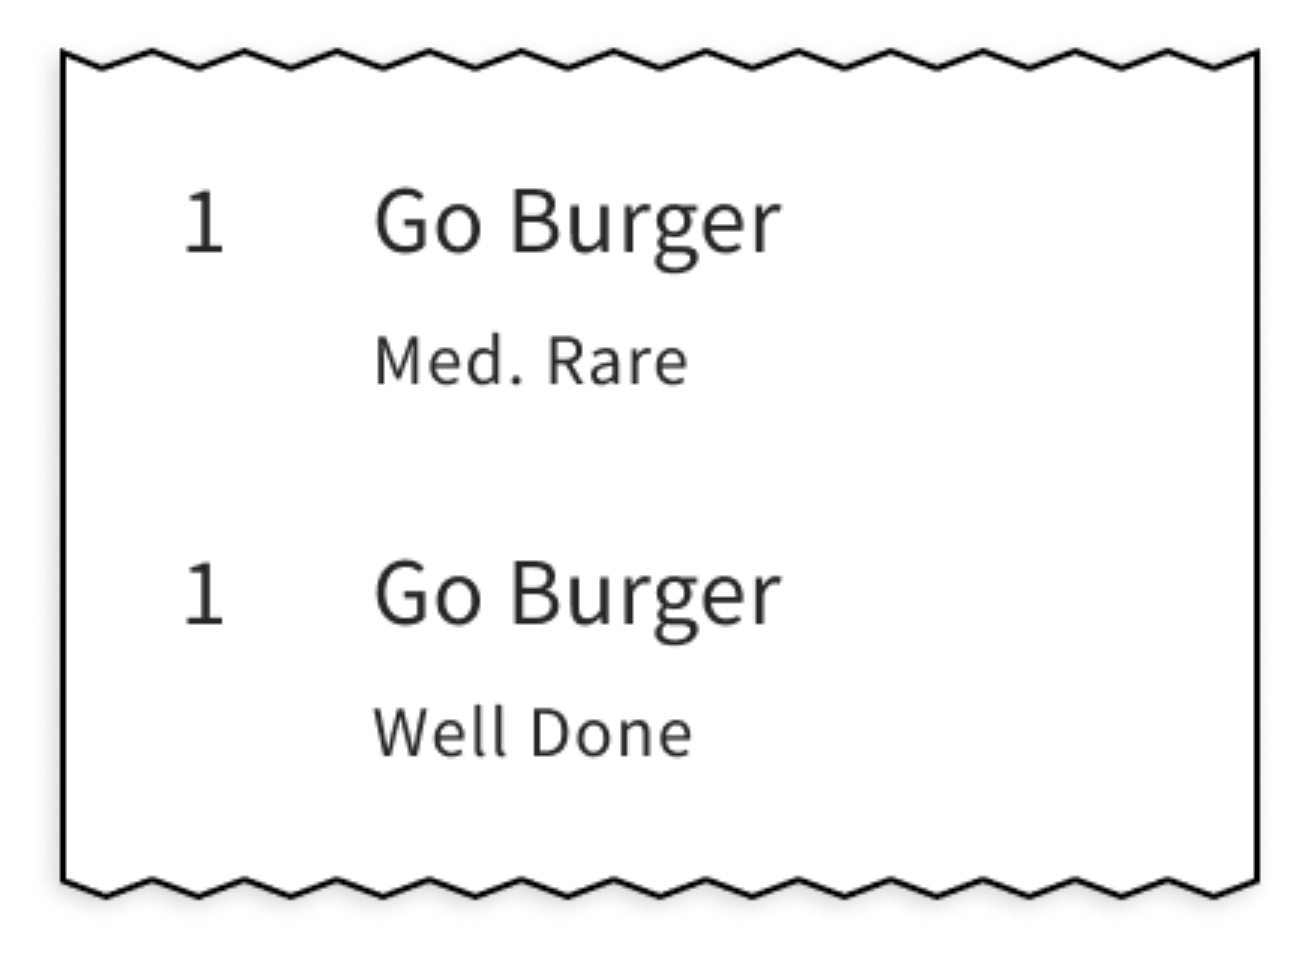
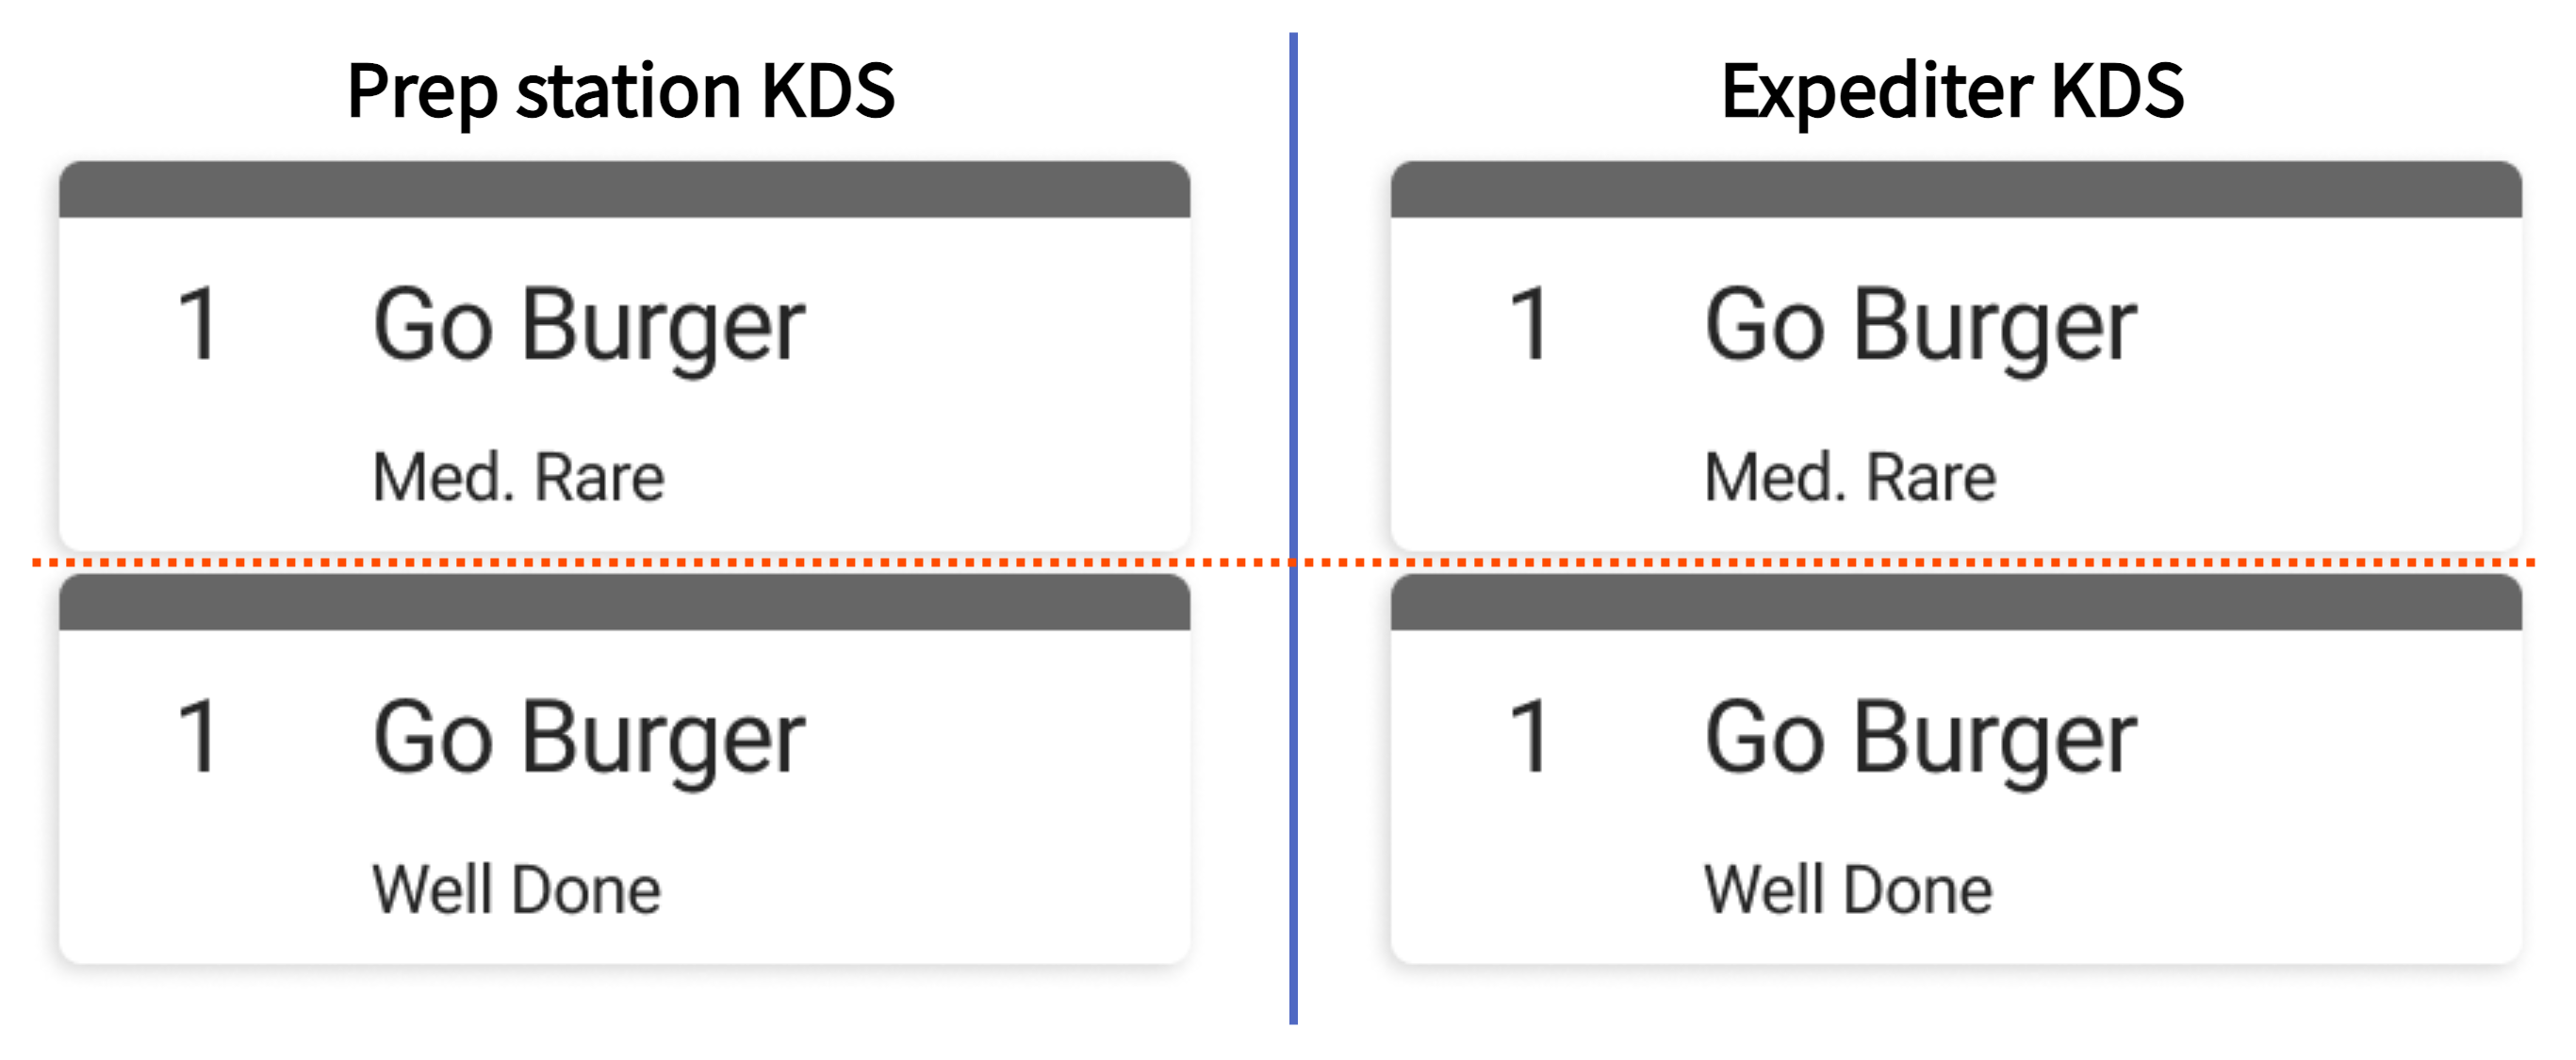
Here is an example of non-consolidated tickets at prep station and expediter KDS devices.
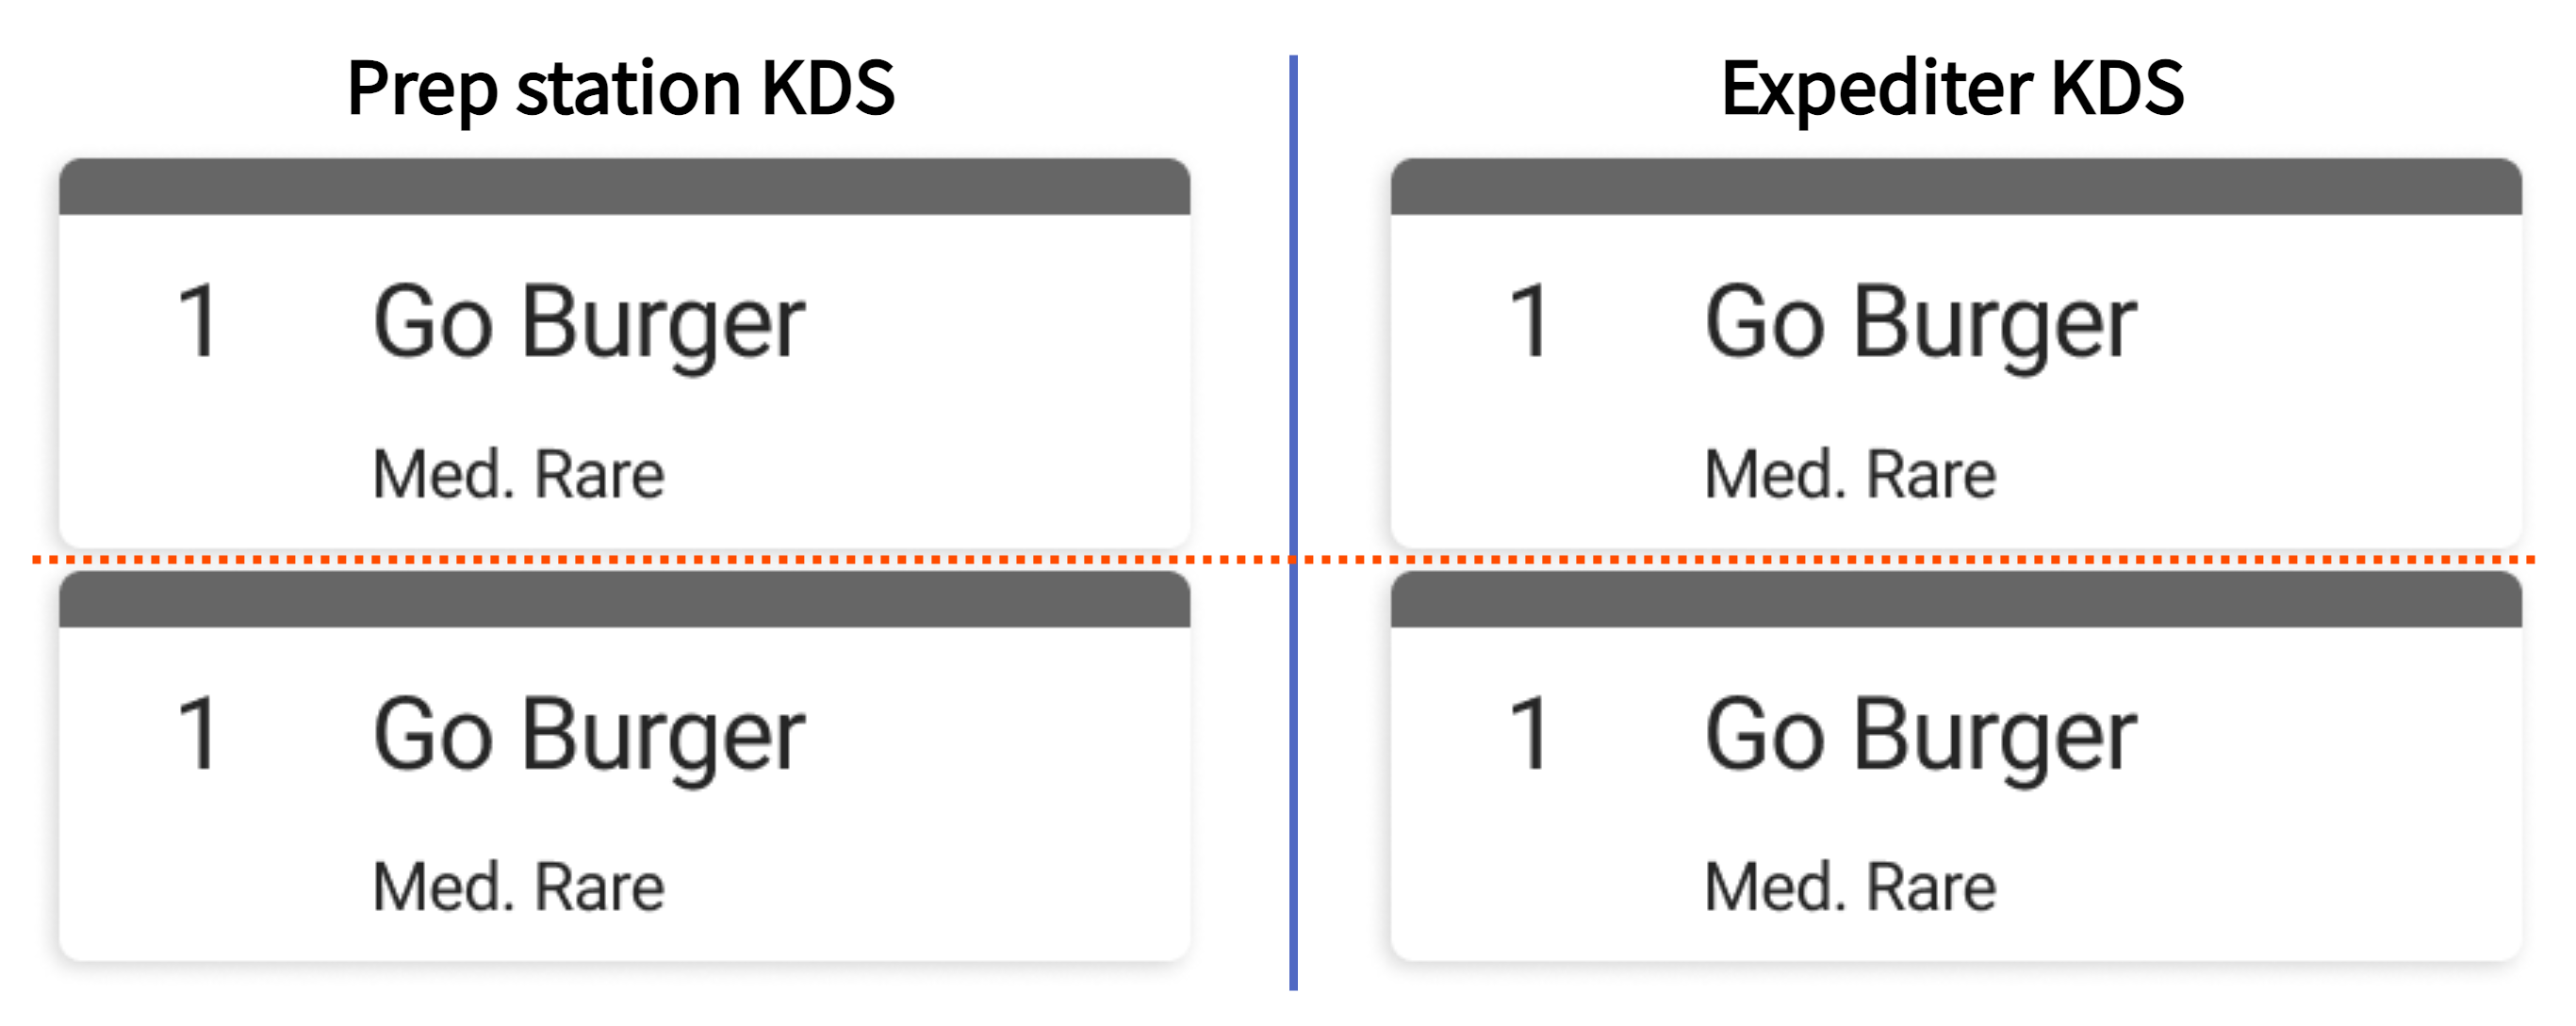
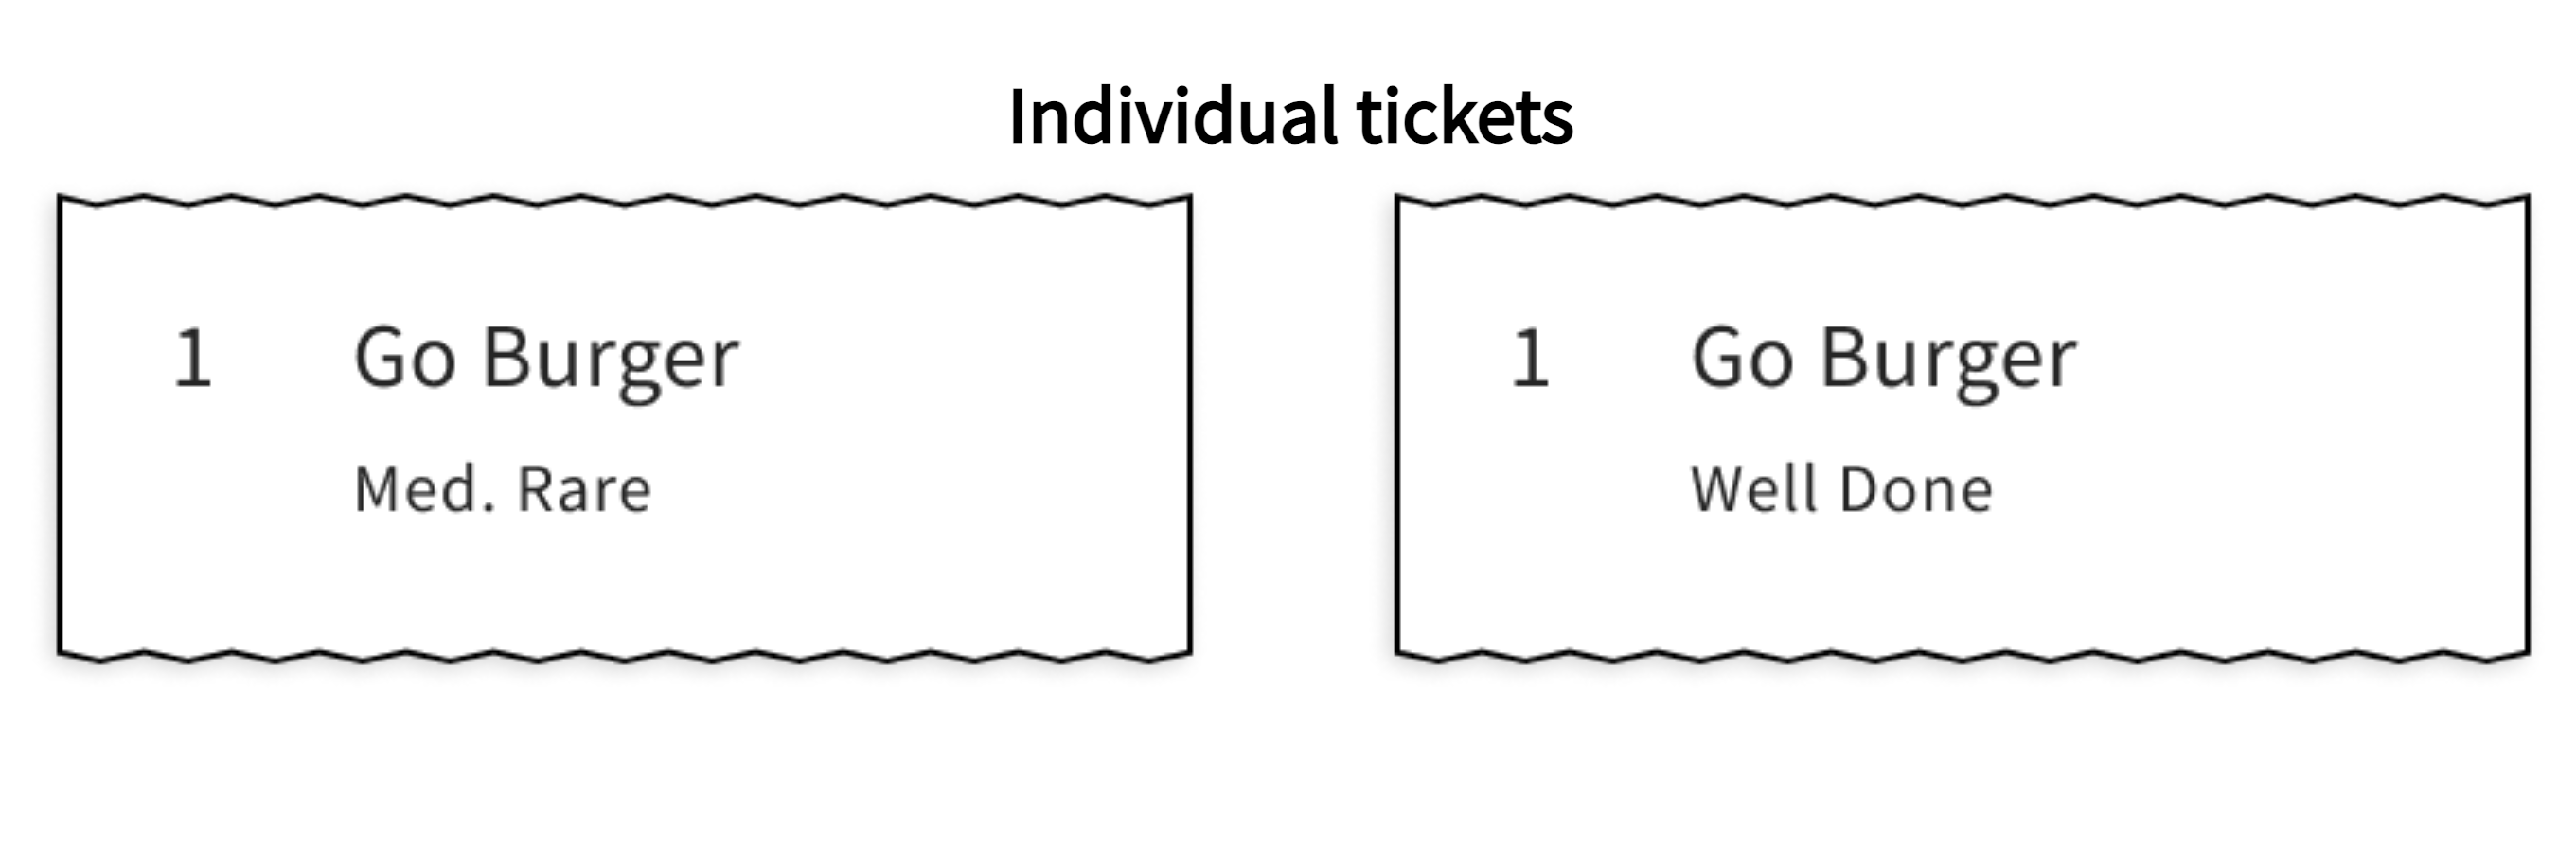
If you choose to use individual item kitchen tickets, each item has a ticket. For this example, consolidated items appear as one ticket for Panini with a quantity of two, while unconsolidated items appear as two tickets for Panini with a quantity of one.
For the Consolidate Items with Multiple Quantities setting, choose Yes to group all identical items into one item line with a multiple quantity. Choose No to separate identical items into separate lines with a quantity of one each.
To configure consolidated items with multiple quantities
-
Navigate to the Kitchen > Printers, tickets, & KDS devices > Kitchen and ticket setup page.
-
Under the Printed Tickets and Ticket Screen section, navigate to the Consolidate Items with Multiple Quantities setting.
-
Select the best option for your restaurant.
-
Yes, consolidate items with multiple quantities as a single entity with an indicated quantity.
-
No, show items with multiple quantities as separate entities, each with a quantity of one.
-
-
Save and publish your changes.