This section provides information about how items and orders can be routed.
To assign prep stations to your menu items you must have the Restaurant Admin > Edit Full Menu access permission. Then, follow these steps.
-
Choose Menus > Menu management > Advanced properties. An interactive grid with rows for each restaurant menu appears.
-
Click the menu name to expand the grid and show the groups in a menu. Repeat this step to show menu items, modifier groups, modifiers, and options.
-
To view and add prep stations, use the Show/Hide drop down list above the table to select Prep Stations. The interactive grid adds a column for prep station assignments.
-
In this grid, you can assign a prep station to an entire menu, a menu group, a menu item, or a modifier option. To assign a prep station, click in the Prep Stations cell for that menu and then select the prep station from the drop down list.
If you assign a prep station to a menu or menu group, the system assigns that prep station to all of the items and modifiers in that menu or group. For example, you assign your "online" menu to a prep station dedicated to fulfilling those orders, and your "in store" menu(s) to different prep stations. You can then override this default assignment as needed for individual menu items and modifiers.
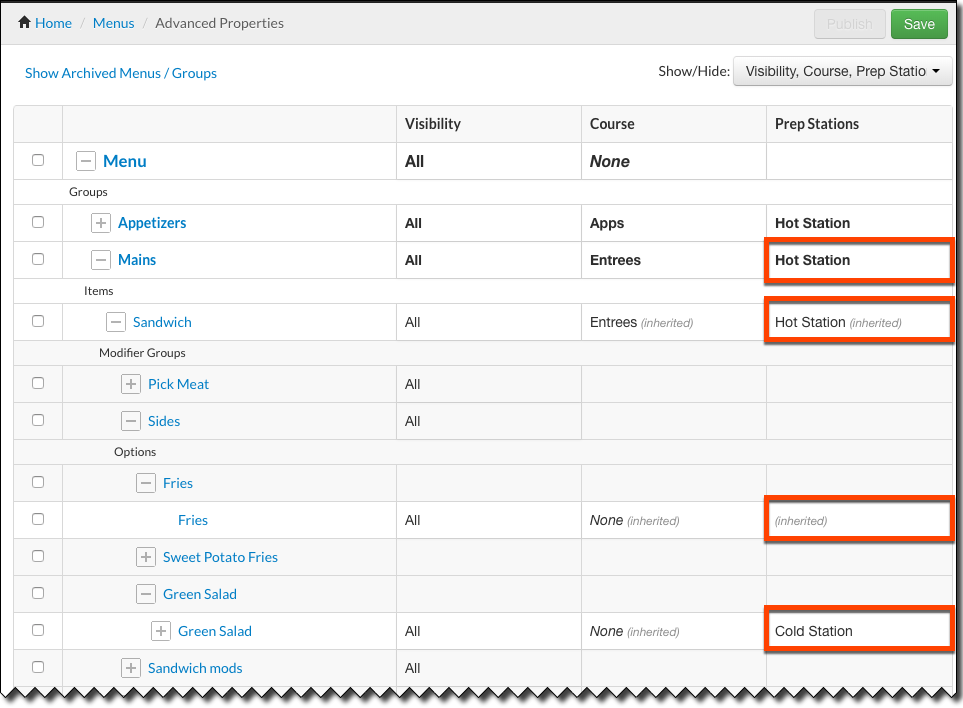
In the illustration that follows, the "Mains" menu group is assigned to the Hot Station, so orders for all of the items and modifiers in that group are also assigned to the Hot Station. To send orders for the side green salad to the Cold Station instead, the inherited assignment is overridden.
-
Save and publish your changes.
The system immediately begins routing order tickets to the kitchen printers and KDS devices at the assigned prep stations.
For individual items that require work at multiple prep stations, you can choose to assign more than one prep station to it. For example, a Caesar Chicken Salad item is sent to both the Cold Station and the Grill Station. For more information on how the item is fulfilled at multiple prep stations on the KDS, see Understanding item fulfillment.
Dine in, take out, or delivery: the dining option that guests select for their meals can have a significant effect on which, and how many, prep stations are involved in fulfilling the order. With the Toast platform, you can set up item routing rules that change the way items are routed for fulfillment based on the dining option specified.
For more information about how you configure dining options, see Dining Options. In addition, this Toast Central article provides an overview of routing by dining option.
The Toast platform also offers a way for kitchens that use KDS devices to display tickets only for specified dining options. For more information, see Filtering tickets on a KDS device.
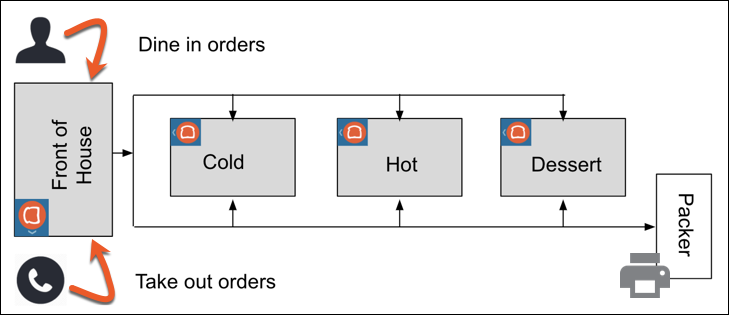
After you define your kitchen prep stations, Cold, Hot, and Dessert, you realize that your take out business has grown so much that your line cooks are spending more time packaging takeout orders than makes economic sense.
To free up the line cooks, you add an employee to package takeout orders and set up a packer station in the kitchen. To make the packer's work efficient, you want tickets for takeout items (but not dine-in items) to print at that station as well as at your Cold, Hot, and Dessert prep stations.

In addition, the following considerations apply to the order fulfillment workflow in your restaurant.
-
Your Cold, Hot, and Dessert stations fulfill both dine-in and takeout orders.
-
All of the menu items that are available for takeout are assigned to the Cold, Hot, or Dessert prep station. Other items (available to dine-in guests only) are assigned to the Bar.
-
The Cold, Hot, and Dessert prep stations use KDS devices, and you add a kitchen printer for the Packer station.
With the Toast platform, you can set up item routing rules to send takeout orders to the packer in addition to your kitchen prep stations.
To send tickets for takeout orders to an additional station you must have the Web Setup > Kitchen / Dining Room Setup access permission.
Next, you set up item routing rules so that tickets for each of the prep stations that produces takeout items will also go to the packer station.

-
In Toast Web, choose Kitchen > Kitchen stations > Item routing.
-
Click the + Add button. The system adds a row to the interactive grid.
-
Enter an identifying name for the first rule. For this example, "To Go Packer - COLD".
-
Verify that the Category for the rule is set to Dining Option. (This is the default and currently the only rule category available.)
-
From the Condition list, select the dining option that your rule applies to. For this example, Take Out.
-
From the Reroute From list, select a prep station that is currently getting tickets for takeout orders. For this example, Cold Station.
You can only select one prep station from this list.
-
From the Reroute To list, select all of the prep stations that should now get tickets for takeout orders. For this example, Cold Station AND Packer.
You can select one or more prep stations from this list.
-
Click the + Add button to add a rule for the next prep station. Add a "To Go Packer - HOT" rule with the following settings.
-
The Category is Dining Option.
-
The Condition is Take Out.
-
The Reroute From prep station is Hot Station.
-
The Reroute To prep stations are Hot Station AND Packer.
-
-
Click the + Add button to add a rule for the final prep station, your Dessert station. For example, add a "To Go Packer - DESSERT" rule with the following settings.
-
The Category is Dining Option.
-
The Condition is Take Out.
-
The Reroute From prep station is Dessert.
-
The Reroute To prep stations are Dessert AND Packer.
-
-
Save and publish your changes.
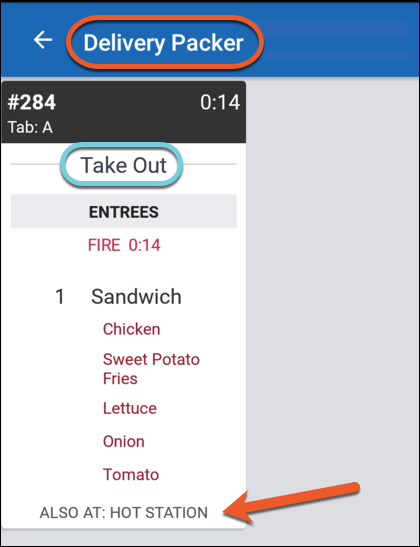
The system immediately begins routing tickets for takeout orders to the Packer station in addition to the originally assigned prep stations. An example of a ticket at the Packer station follows.

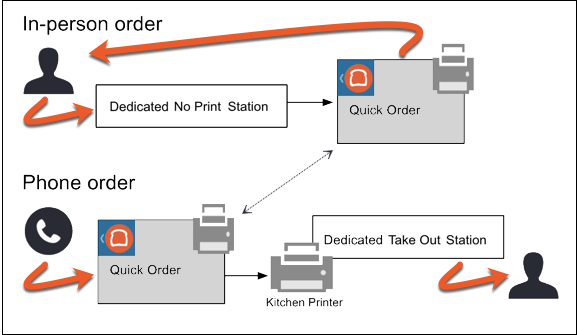
The business model for your quick service restaurant gives guests the option to either place orders in person and receive them immediately, or phone in their orders for pick up at a specified time.
To accommodate both dining options as efficiently as possible, your kitchen has two identical prep stations, one to fulfill in-person (dine in) orders and the other for phone (takeout) orders.

In addition, the following considerations apply to the order fulfillment workflow in your restaurant.
-
Both order types are entered by the same cashier, who uses a Toast POS device in Quick Order mode.
-
For in-person orders, a line cook works with each guest to prepare meals to order. As a result, kitchen tickets are not needed for orders placed in person, but they are essential for phone orders.
-
Your dedicated dine-in prep station is assigned to all of your menu items.
With the Toast platform, you can route orders to a different prep station based on the dining option specified for the order.
To send tickets for takeout orders to a different prep station you must have the Web Setup > Kitchen / Dining Room Setup access permission.
After you add your dine-in and takeout prep stations, you set up an item routing rule so that tickets for takeout orders go to the dedicated prep station for takeout only.

-
In Toast Web, choose Kitchen > Kitchen stations > Item routing.
-
Click the + Add button. The system adds a row to the interactive grid.
-
Enter an identifying name for the rule. For this example, "Take Out".
-
Verify that the Category for the rule is set to Dining Option. (This is the default and currently the only rule category available.)
-
From the Condition list, select the dining option that your rule applies to. For this example, Take Out.
-
From the Reroute From list, select the dine-in prep station. For this example, Dine In (No Print).
You can only select one prep station from this list.
-
From the Reroute To list, select the prep station that should get tickets for takeout orders instead. For this example, Take Out.
You can select one or more prep stations from this list.
-
Save and publish your changes.
The system immediately begins routing tickets for takeout orders to the Take Out prep station only.
